Monday, December 26, 2011

...gifts, wrapping and Christmas cheer

This Christmas I wanted to continue a handmade bent similar to the gift bags last year. But I didn't want to make bags again necessarily because I think that years and years of handmade bags might become as useless as using commercial wrapping paper. So what I decided to do was to make everyone a handmade item to go with anything that was bought and then use this to contain the 'gift' item or to wrap them in some tea towels I screen printed. So to the list.... Wine bottle bags using a combination of this tutorial and this one too
to wrap some some for siblings and parents.

 Ear buds pocket from this tutorial for my brother, the little ring will keep it attached on his physical endeavours.

 For Nan, a knitting needle roll from this tutorial, She is a long standing knitter and could always use more storage!

 A couple of these and one of these from Keyoku Lou's great patterns.
Mosaic
The art folio from Growing Up Sew Liberated


A Hexie organizer for Mum


A couple of Kindle cases for Nik, adapted from this tutorial


A reading pillowcase - I adapted the pattern to include a zipper in the back to turn it into a 'cover' rather than a 'pillow'. It will fit a standard cheap pillow and is washable. 


Some wrapping, screen printed following my class with Louise Snook and with a snowflake very loosley based on a tutorial from here   


Friday, December 23, 2011

...Perth Bingo


I remember the strangest things. When I was a teen (early, mid, late who can remember those details?) I was at one of my grandparents Christmas get-togethers. The kind where all the cousins come. And I am not talking about the children of my aunts and uncles. My grandma understands the meaning of the term second cousin twice removed and invite them round for drinks. Last time I went this event was held in a park. I am surprised we didn't need a permit.

But I digress, one the cousins (of undetermined to my understanding level and removal status) commented that   she believed nowhere ever felt as much like 'home' as where you lived as a teen. I am not sure if I fully accept the idea but I think it has some merit. There are things about Perth, a familiarity gained through years of public transport travel that I have abut Perth I don't think I will ever have about another city.

See, what a strange thing to remember 15 years later. It popped into my head the other day when I was considering Perth Bingo.

Perth Bingo you ask? Well, I've not lived in Western Australia for about 4 years now, and some very good friends of both N and I have lived away for a little longer than that. But we all spent those teen years and a good deal of our early 20's in various parts of Perth. And there are little things that I and they miss, like the taste of a burger from that store, or the sound of the waves on Cottesloe beach and the sun setting over the water. Things that have approximations in other places but are never quite like they are at home. Because our visits home usually coincide with the others we play Perth Bingo. There are no rules, no prizes, and until this post no actual list, of things to do while in Perth. The lists is constantly changing, not the same for everyone (although some things we usually all have an do together) and often heavily weighted towards the eating
domain.


So my list for 2011/12

A Masters Iced Coffee - there is something about this brand that has not translated to any other I have had on the east coast. I couldn't describe the taste of this except to say that the others seem sweet in comparison. I have been known to buy one at the airport on arrival and request some bought home for me when I haven't made the trip.


Calico & Ivy - A fabric and yarn shop not so far from Fremantle and Cottesloe. It is a reasonably new addition to my list but I love the vibe in the shop and their stock of fabric. I've been once already this trip but I may not be the last visit before I fly home!

Alfred's - Apparenttly Matt Preston is also a fan. Alfred's is this little side of the road hamburger joint left over from the 70's. I guess it is a little similar to Harry's in Sydney. There is always a massive post of pea and ham soup on the wood stove to sip while you are waiting for your burger to be cooked. The kind where you need to dislocate your jaw to get you mouth around it and there is no need for additional chips and no room to fit them in anyway.


Cottelsoe Beach


Supa Golf - This is the coolest thing, think golf crossed with mini golf.  An approaching full size course (the holes aren't quite as long but I would say they are as challenging) with balls the size of tennis balls but made of a hard material that mimics actual gold balls. Just play early in the morning or in the evening to prevent sunburn and steer well clear of the back nine if you can.

Textile Traders - is a locally owned fabric chain store that I have posted about before. Always worth a visit!

The Junction Ice-creamery - Award winning ice cream within walking distance of my high school. Need I say more. Maybe I will, they will make the milkshakes with the ice-cream for the cones. They are delicious.

Fit Chips - I don't know that this really qualifies because it actually appeared after I moved. However the only place I have ever seen it is in the chopping centre I always went to as a teen and my friend introduced me to it. The chips are all air fried (no oil) and you get a little tub of the dipping sauce of your choice. Hmm, fit chips.

There will be more, but I can't think of them right now. I'm thinking of Fit Chips. 

Wednesday, December 21, 2011

...the one where I get obsessed about colour

I left work early today, so as not to run any chance of missing the plane like we did just over a year ago.
I stopped on the way home to pick up a thread colour card. It wasn't there. I went into the post office and gave then a tracking number. It was ad the delivery centre in the next suburb. I made then call. I checked my watch to see if I had time to collect it. I decided I did, just. I rushed over there.
They didn't know what I was talking about. I checked my watch. They looked. They realised they had moved it, the very person that claimed she didn't know what I was talking about. They gave it to me. I rushed home.
Now we wait. Me with my new patchwork water bottle.

Monday, December 19, 2011

...cupcakes

Since I posted about the Cookie {recipe} Swap I've done nothing but make cupcakes!
I think this is the last of the end of the year festive activities at work so the last of the festive cupcakes too?

Saturday, December 17, 2011

...take anywhere placemat and cutlery set - a tutorial

At a recent craft show I took a quick class to learn a few more features on my overlocker and made a take anywhere placemat. I liked the idea of it but not so much some of the finishes so I have made up another with some different finishes.

This is a great project to use up some fabric and batting scraps and would be a great little gift for those that like to take lunches to school, work or anywhere!

Materials
You will need
4x (4"x12") strips of fabric 1 (mine is the Coal solid)
6x (4"x12") strips of fabric 2 (mine is the circuit board print)
5x (4"x12") batting strips
2x 2.5" WOF strips for binding
1x 2.5" WOF strip for tie

Optional - Small cutlery set. I used this one but these are cool too.

Construction
Step One
Cut out the fabric and batting as listed above


Step Two
Take two of your fabric one strips and three of the fabric two strips. Carefully position these on each of the five batting strips.
Iron these together to help them to 'stick' together.

Step Three
Place one of the Fabric 2 strips on the back of one of the fabric/batting pairs with the right sides out as pictured below.
Place one of the Fabric 1 fabric/batting pairs fabric side down on top and one of the unpaired Fabric 1.
You will end up with (from top to bottom) batting, Fabric 1 (RS down), Fabric 2 (RS up) batting, Fabric 2 (RS down), Fabric 1 (RS up). Check the picture below if that is clear as mud!
Note: You want all the edges to align, mine are staggered to help you see the order. 
Step Four
With a 1/4" seam (and I would strongly recommend a walking foot) sew down one long side of the sandwich
Flip both the Fabric 1 sections out so all fabric is right sides out with batting sandwiched in the middle.
Press
Layer the next section on top of the Fabric 1 section that you just pressed.
You will end up with the exact same sandwich with the Fabric 1 and Fabric 2 positions swapped.
Continue sewing the fabric to the previous section as before until you have 5 strips.

Step Five
Trim the top and the bottom of the joined sets to make a squared up rectangle.
Step Six Making the ties
Iron your tie fabric right sides together along the long edge.
 Using a 1/4" seam allowance sew across the short end, down the long side where the two raw edges meet and down the other short side pivoting at the corners 1/4" from the edges.
 Trim the corner, then cut the strip in half giving two ties
Turn the ties right side out and press. A good way to turn is to poke a pencil into the sewn end and then side the tube down the pencil.
Step Seven
Prep the binding by sewing the two strips together with a bias seam and then pressing wrong sides together down the links as you did for the tie.
Place the two ties in the centre of the long mat sides, with one on the front and one on the back matching the raw edges.

Sew the binding on the front of the mat, mitering at the corners. Fold the binding over the raw edges and secure with machine or hand stitches. I chose to use the machine for strength as I assume this will go in the washing machine fairly regularly.
Viola!

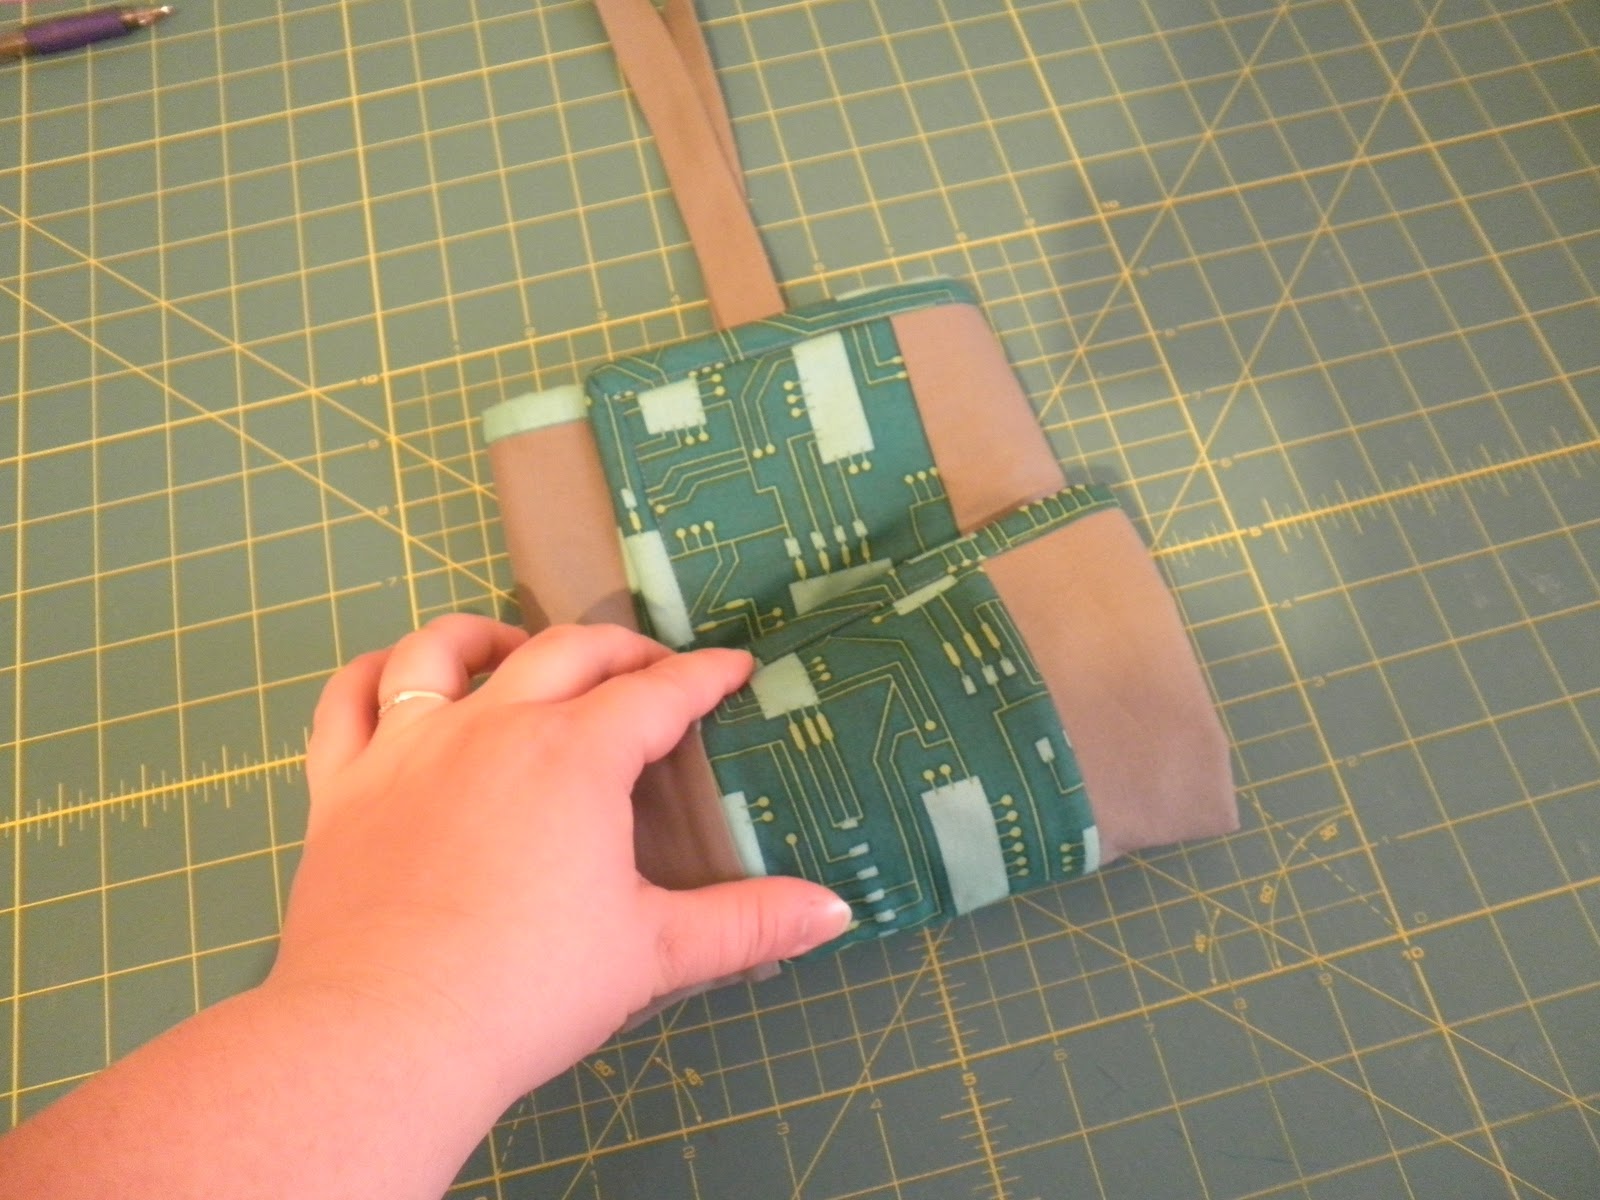
To fold the cutlery set in the placemat place the cutlery set in the centre as pictured.
Fold the left side to the centre
Then repeat with the right side.
Working from the bottom (the side without the tie turn the bottom up and then roll up, enclosing the cutlery set.
Wrap the ties around the bundle and tie in a bow. Pack yourself a picnic and enjoy!

Monday, December 12, 2011

...Holiday Cookie {recipe} Swap

Recently Kaelin posted about her Cookie Swap and, combined with the TV ads all about Christmas that are all over the TV at the moment, it has got me thinking about holiday traditions and depictions.

Last Christmas was the first Christmas EVER that I had worn flannel PJ’s to bed on Christmas Eve, cause it was the first time in the last 30 years that it was cold enough to in Australia. But that doesn't stop the TV ads that are set in Australia being depicted as happening during cool weather (not snow and ice but long sleeves at least) and the decorations we erect having a wintry theme.

But honestly, for most of Australia, during most of the Christmas season we are talking about it being insanely hot, like 35 degrees Celsius plus, so a cream or custard based eggnog is the last thing that anyone wants to drink. There is a reason that Santa is often left a cold beer or other beverage (in fact my siblings, cousins and I once got a complaint letter from Santa because the cool drink left for him had warmed at the time of his arrival).

Which I think is, in part, why the cookie swap tradition (that I had not heard of before) seemed like such a good idea, cause cookies can be an all year and all weather kind of thing.

And then I thought some more, and I thought about how this could be so versatile and wondered if a virtual online swap would work. Where the swap is recipes rather than the actual cookies.

oreos with milk
Image and recipe from here

I’m not sure if it actually is a good idea or just another of my crazy ideas, if I have enough readers to get enough participants, if people have enough time at this time of year to participate, if there is any interest - but I am going to try anyway.

So please link up below to a post with the recipe of your favourite holiday (or anytime) cookie or biscuit.


Sunday, December 4, 2011

...not one with perfect photos or sewing spaces

My house is never showroom worthy nor the photos on my blog wonderfully styled but I like to think that a lot of the time both are passable. Today is not one of those posts!

Yesterday morning I woke up early, not that unusual for me as I do every weekday, and given the looming Christmas deadline and the list of things I want to make beforehand I thought a tidy up of the sewing room was well in order in the quiet of the morning.
OK so this is actually the before and after picture but you get the idea. Lots of small projects on the go at the same time and this room looks like a bomb or tornado has hit it.

Initially it all went quite well. I usually start at the left of the table near the bookcases and work my way across, putting things away and sorting as I go and initially this is what I did. Then I got to the right of the cutting mat and found my stack of Prima solids from Spotlight that were waiting to be
a) sampled to add to my improv colour chart, ie actual samples cut and pasted to a printed copy that showed the colours poorly
d) cut to make the rings in a baby-sized Single Girl quilt.
In the same area were the already cut centres and backgrounds for said Single Girl and the printed colour chart from Spotlight.

It was a perfect storm. To tidy up in my usual way I had to make both items. I couldn't face stuffing them in the cupboard only to have to pull them out again at some time in the, probably distant, future.

So the stack of fabric on the floor (still there by the way despite today's early morning) is what is left after all the arc pieces were cut and the 1.5" squares were taken for comparison with the colour chart.

The colour placement was chosen with a coloured diagram and cut using these acrylic templates. Made it so fast and accurate...compared to the traced plastic templates. There are still 36 of them.

Soon I had a stack like this.
(See the stack of fabric on the sewing machine...that is one of the gifts I should have been working on.

And after a visit to a relative in hospital and a detour to Spotlight to match the colours to the chart that did not scan at all accurately I came home and stitched the last 3 quarters together.

I was surprised how quick this was to make. The arcs were all cut and the whole top together in 7 or 8 hours.  I am comfortable with curves which no doubt made it quicker than someone who is doing it for the first time and the templates did speed things up dramatically but chain piecing all the arc pieces for one quarter at once meant I sped through.

Now I have this top
and it will go in the cupboard until after Christmas when I have some time to quilt it and to work out who gets it!

NOTE: I reversed the print and the solids from how it is printed in the pattern as I had read several comments that the large amounts of negative space were a turn-off for many about this design and as this was to be sized for a baby I thought the more print to hide the inevitable mess and spills could be a benefit. I was worried about the pattern and how it would look at the centre of the circle joins but I think one spaced as this is can carry it OK.

As this was a sample before I tackle a queen size for our bed now I am wonder how I want to place the fabrics for ours.
I can think of three options
1. Prints for arcs and solids for backgrounds...the way it is written.
2. Tone on tone prints for the arcs (white or cream probably) and a single print for the background like I have done here.
3. Tone on tone for the arcs and then many prints for the centres and "corner" backgrounds (the centre of this quilt) so that area is all the same. I know what I mean, I hope you do too but it is early and the laptop needs charging...


Fabric: Rocket Scientist from Robert Kaufmann (2009)
            Prima Homespun from Spotlight in various colours

Sunday, November 27, 2011

...like a hole in the head

That is how much I need the project I just started now... but I have no-one to blame other than myself.

Like many other people at this time of year I have a Christmas crafting list longer than my arm and a work list even longer than that and with a shorter deadline. In fact this afternoon I sat at the kitchen table alternating between Christmas crafts, work tasks and a very healthy dose of procrastination, all the while achieving very little a new quilt design kept crowing into my thoughts.

I tried to ignore it, I tried to pacify it by drawing some of it out.

It didn't work. It kept pointing out it was Sunday afternoon and I should do something just for fun.

I decided that it had a point. So I have sewed up a block. Too soon to tell yet if this will be enough to keep it at bay while the other lists are attended to and hopefully get a little shorter.

It  is all machine pieced, and for the record I think Y seams are completely achievable with some accurate cutting and a little marking. As a square it would measure almost 20".

Fabric is Saffron Craig Imaginary Flowers and Beetle Bugs